  1. Posts/

RFID Jukebox: The Firmware

·2148 words·11 mins·
Projects Lights ESPHome Smart Home DIY Music Home Assistant Music Assistant
Table of Contents
RFID Jukebox - This article is part of a series.
Part 3: This Article
Without the firmware, this whole thing would’ve been just an expensive paperweight that takes up too much space on the desk.

This project uses the indispensable ESPHome project to generate firmware for the ESP32 microprocessor that powers the Lilygo T-Embed. It converts a machine-readable description of what the firmware should do to code that runs on the ESP32 with little to no coding.

You can download the full configuration file in the project’s GitHub repository. Also check out the ESPHome’s documentation to learn more about the structure of the file, core components, supported boards, etc. Here, we’ll only go through the parts that define behavior of the device.

Global Variables
#

First, we’ll need some variables to keep the device’s state in: has a tag been scanned, settings of the light (brightness, color, effect), state of the menu (“menu” being a fancy name for storing an information about how many times was the button pressed). We’ll use ESPHome’s globals component.

 1
 2
 3
 4
 5
 6
 7
 8
 9
10
11
12
13
14
15
16
17
18
19
20
21
22
globals:
  - id: tag_active
    type: bool
    initial_value: "false"
  - id: light_brightness
    type: float
    initial_value: "0.0"
  - id: light_red
    type: float
    initial_value: "0.0"
  - id: light_green
    type: float
    initial_value: "0.0"
  - id: light_blue
    type: float
    initial_value: "0.0"
  - id: light_effect
    type: std::string
    initial_value: '"None"'
  - id: menu_state
    type: int
    initial_value: '0'

ESPHome often uses lambda functions to inject snippets of user-defined C/C++ code that defines functions. Lambda functions are by definition stateless. That’s why globals are needed to carry information between the calls.

We might also get away with using static variables inside the lambdas.

ESPHome’s time: component configuration defines timezone using this crazy format. The <Region>/<City> format could also be used, but it’s less accurate. This component will provide - you guessed it - the current time.

1
2
3
4
time:
  - platform: homeassistant
    id: home_time
    timezone: CET-1CEST,M3.5.0,M10.5.0/3

RGB LEDs
#

And finally, here’s something interesting: configuration of the component that drives the RGB LEDs.

 1
 2
 3
 4
 5
 6
 7
 8
 9
10
11
12
13
14
15
16
17
18
19
20
21
22
23
24
25
26
27
28
29
30
31
32
33
34
light:
  - platform: esp32_rmt_led_strip
    chipset: WS2811
    pin: GPIO38
    num_leds: ${led_count}
    name: ${friendly_name}
    id: internal_light
    rgb_order: GRB
    use_psram: false
    use_dma: true
    max_refresh_rate: 16ms
    effects:
      - addressable_rainbow:
          name: Rainbow
      - pulse:
          transition_length: 1s
      - lambda:
          name: "Notification"
          update_interval: 1s
          lambda: |-
            static int state = 0;
            // https://esphome.io/api/classesphome_1_1light_1_1_light_call
            auto call = id(internal_light)->make_call();
            if (state == 0) {
              // Dim the light
              call.set_state(true);
              call.set_brightness(1);
              call.set_transition_length(1000);
            } else if (state == 1) {
              call.set_brightness(0.5);
              call.set_transition_length(1000);
            }
            call.perform();
            ++state %= 2;

It’s a bit on the longer side, but ESPHome’s documentation does a great job explaining all the options. I’ll just focus on the lambda function that implements a light effect called “Notification”. It’s a light effect played when a card is scanned.

The lambda: contains a small, anonymous C++ function, which depending on the state of the state variable (which is static, so it will keep its value from one execution of this code to another), will either:

  • transition the light to the full brightness over 1000ms
  • transition the light to half brightness over 1000ms
 1
 2
 3
 4
 5
 6
 7
 8
 9
10
11
12
13
14
    static int state = 0;
    // https://esphome.io/api/classesphome_1_1light_1_1_light_call
    auto call = id(internal_light)->make_call();
    if (state == 0) {
        // Dim the light
        call.set_state(true);
        call.set_brightness(1);
        call.set_transition_length(1000);
    } else if (state == 1) {
        call.set_brightness(0.5);
        call.set_transition_length(1000);
    }
    call.perform();
    ++state %= 2;

The last line is a convoluted way of saying “toggle the state between 0 and 1”, equivalent of:

1
2
state = state + 1;
state = state % 2;

Note that the effect is configured with an update_interval of one second, which means that the lambda function will run every second. Transition times are also one second, so this effect should create a slow pulse of light.

Idea is to play this effect when a card is scanned, and go back to whatever light was on before the card was scanned. The two scripts that follow do just that: store and restore the configuration of the light.

 1
 2
 3
 4
 5
 6
 7
 8
 9
10
11
script:
  - id: store_light_state
    then:
      - lambda: |-
          id(internal_light).current_values_as_brightness(
            &id(light_brightness)
          );
          id(internal_light).current_values_as_rgb(
            &id(light_red), &id(light_green), &id(light_blue)
          );
          id(light_effect) = id(internal_light).get_effect_name();

These scripts use functions that are not listed in the ESPHome’s docs, at least not the one written in prose. API reference always comes in handy when writing lambdas; see LightState class reference.

The store_light_state script stores several values in the global variables: current brightness, color (expressed as RGB), and name of currently played effect (ESPHome uses “None” when no effects are in progress).

The restore_light_state does the opposite: reconfigures the light using the stored variables.

 1
 2
 3
 4
 5
 6
 7
 8
 9
10
11
12
13
14
15
16
17
18
19
  - id: restore_light_state
    then:
      - lambda: |-
          // Change the effect first to make sure that whatever effect was there previously
          // is now disabled. If we're restoring to a disabled light, previous effect
          // would not get disabled because ESPHome can't set effect/flash when
          // turning off the light.
          auto call_effect = id(internal_light).turn_on();
          call_effect.set_effect(id(light_effect));
          call_effect.perform();

          auto call = id(internal_light).turn_on();
          call.set_brightness(id(light_brightness));
          call.set_rgb(
            id(light_red),
            id(light_green),
            id(light_blue)
          );
          call.perform();

Finally, there’s a small script called notify_error:

 1
 2
 3
 4
 5
 6
 7
 8
 9
10
  - id: notify_error
    then:
      - light.control:
          id: internal_light
          effect: "Notification"
          blue: 0%
          red: 100%
          green: 0%
          state: on
      - delay: 4s

It sets the color of the light to red and triggers the “Notification” effect. The four second delay creates a couple of pulses of a red light. Seems like an appropriate notification about an error.

RFID Tag Reader
#

These scripts are later used in the configuration of the PN532 tag reader. The device doesn’t have many configuration options, magic is all there in the automations: on_tag and on_tag_removed.

1
2
3
pn532_i2c:
  update_interval: 1s
  i2c_id: i2c_bus0

When a tag is scanned, the on_tag automation is triggered. It first checks if the Home Assistant is connected. Bulk of the logic, including the streaming server, are in the Home Assistant. If it’s not connected, scanning a card would have zero effect.

It’s a nice thing to do to somehow notify the user about this.

1
2
3
4
5
6
7
8
9
  on_tag:
    if:
      condition:
        not:
          api.connected:
      then:
        - script.execute: store_light_state
        - script.execute: notify_error
        - script.execute: restore_light_state

That’s why if API is not connected (see how ESPHome-style atuomations are self-explanatory?), the device stores the current state of the light, plays the notify_error script, and restores the light.

Effect? If a card is scanned when Home Assistant is not connected, a red light will pulse for a few seconds.

But what if the Home Assistant is connected? That depends on whether a tag has already been scanned, or not. The assumption is that a card stays on the device for as long as the music is supposed to play. But if the card is just lying there, the tag reader will likely scan it multiple times, restarting the stream each time. Not an ideal situation.

That’s where the tag_active global comes in. If a card is scanned, the tag_active becomes set to true, and stays that way until on_tag_removed is triggered.

1
2
3
4
5
6
  else:
    if:
      condition: 
      # Only proceed if there is no active tag
        - lambda: |-
            return !id(tag_active);

OK, let’s say that it’s the first time a card has been scanned. First thing we should do is set the tag_active variable. After that we’d like to play the “Notification” light effect, so the store_light_state script gets executed, light is turned on for 2 seconds to play the effect, and the restore_light_state script brings back whatever settings were there before.

 1
 2
 3
 4
 5
 6
 7
 8
 9
10
11
12
13
14
15
16
17
18
19
20
21
22
  then:
    - globals.set: 
        id: tag_active
        value: 'true'
    - logger.log:
        format: "Tag found: %i"
        args: [ 'id(tag_active)' ]
    - script.execute: store_light_state
    - homeassistant.tag_scanned: !lambda "return x;"
    - light.turn_on:
        id: internal_light
        effect: "Notification"
        brightness: 50%
        red: 50%
        green: 5%
        blue: 92%
    - delay: 2s
    - script.execute: restore_light_state
  else:
  - logger.log:
      format: "Tag active: %i"
      args: [ 'id(tag_active)' ]

Take a look at the highlighted line. This is the core of the jukebox feature: triggers a tag_scanned action in the Home Assistant, passing the value of the tag. That’s it.

Only thing left to do here is to define what to do when the tag is removed:

1
2
3
4
5
6
7
8
on_tag_removed:
    then:
      - globals.set: 
          id: tag_active
          value: 'false'
      - logger.log:
          format: "Tag removed: %i"
          args: [ 'id(tag_active)' ]

But you might say: “It only changes the value of the global variable! How does this affect anything, let alone the playback?”. Excellent question!

1
2
3
4
5
binary_sensor:
  - platform: template
    name: Tag Active
    lambda: |-
      return id(tag_active);

This little thing called a binary sensor (name implies that it can only take one of two states) reacts to the changes of the tag_active global variable, and exposes its value to the Home Assistant.
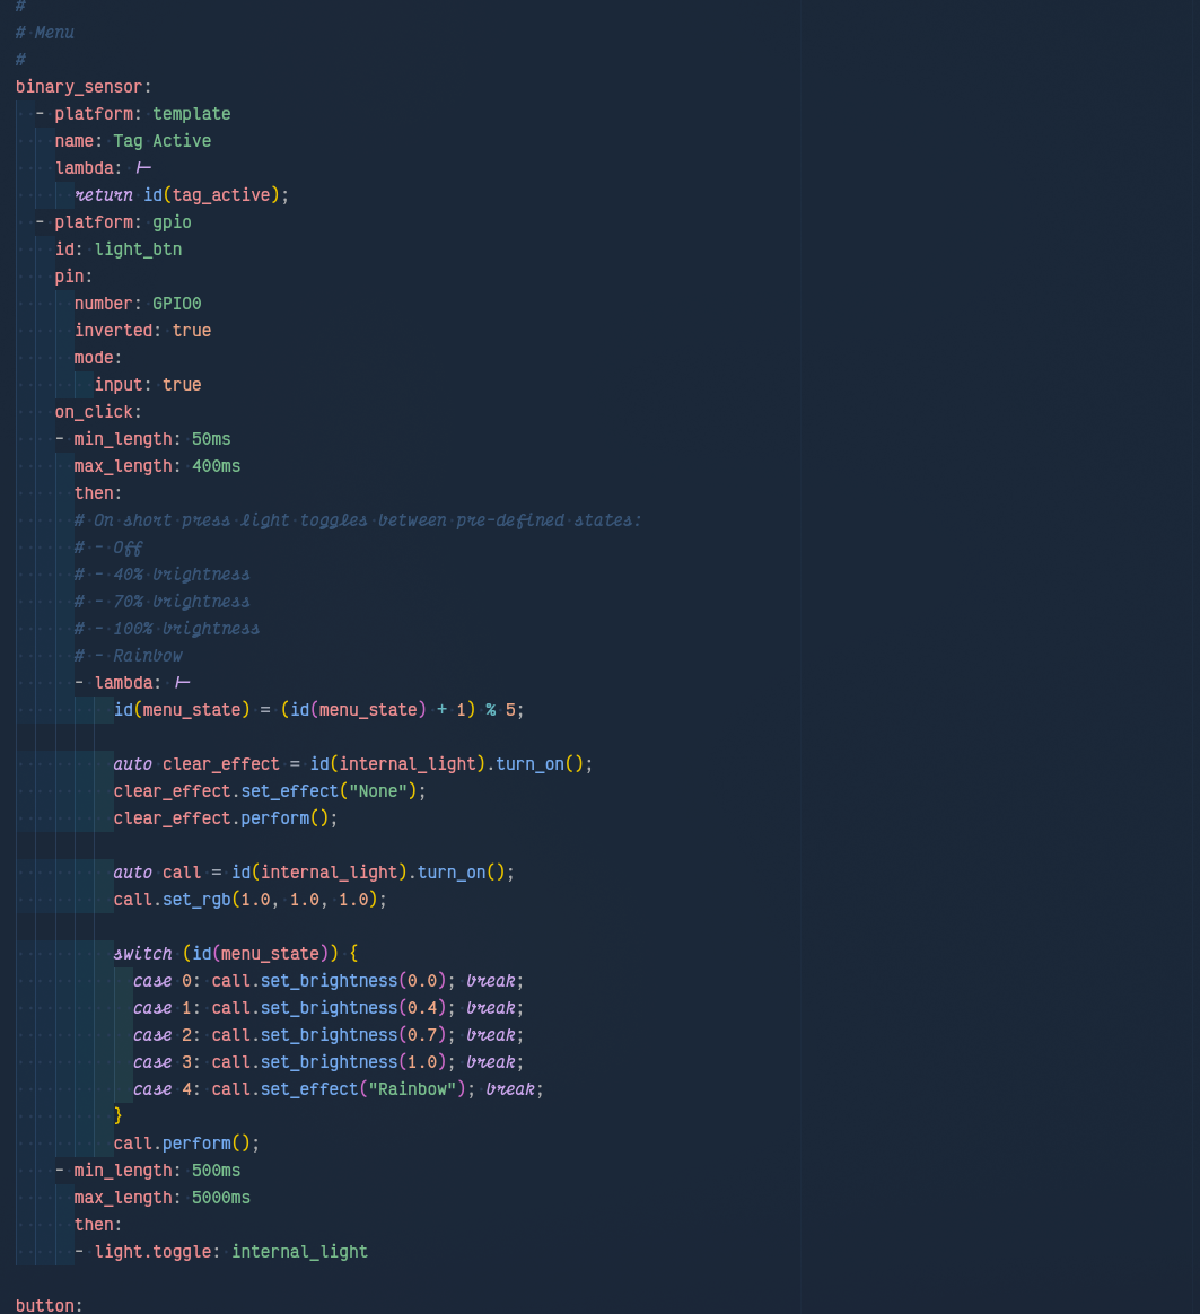
Make sure to check out how a flaw in the design concept impacted the firmware implementation of how to monitor the removed tags.

The Button
#

The button does one, super-important thing: makes this device usable1. What’s the point of a night light if you have to spend more than two seconds turning it on or off?

The button is handled by another instance of the binary sensor component:

1
2
3
4
5
6
7
  - platform: gpio
    id: light_btn
    pin:
      number: GPIO0
      inverted: true
      mode:
        input: true

When using the T-Embed, the button is connected to GPIO0. inverted determines how to translate physical state (voltage) of the GPIO to logical (on/off, true/false, active/inactive). Buttons connected to GPIO lines typically toggle between the ground and VCC. “Inverted” means that the high voltage will translate to “inactive” and the low voltage - to “active”2.

But what should happen if someone clicks the button? If it’s a short click, light should toggle between a few brightness settings and everyone’s beloved Rainbow effect.

 1
 2
 3
 4
 5
 6
 7
 8
 9
10
11
12
13
14
15
16
17
18
19
20
21
22
23
24
25
26
27
28
    on_click:
    - min_length: 50ms
      max_length: 400ms
      then:
      # On short press light toggles between pre-defined states:
      # - Off
      # - 40% brightness
      # - 70% brightness
      # - 100% brightness
      # - Rainbow
      - lambda: |-
          id(menu_state) = (id(menu_state) + 1) % 5;

          auto clear_effect = id(internal_light).turn_on();
          clear_effect.set_effect("None");
          clear_effect.perform();

          auto call = id(internal_light).turn_on();
          call.set_rgb(1.0, 1.0, 1.0);

          switch (id(menu_state)) {
            case 0: call.set_brightness(0.0); break;
            case 1: call.set_brightness(0.4); break;
            case 2: call.set_brightness(0.7); break;
            case 3: call.set_brightness(1.0); break;
            case 4: call.set_effect("Rainbow"); break;
          }
          call.perform();

Note that every time the button is pressed, the effect is cleared, even though it might be set right back on. Why not do it like that?

 1
 2
 3
 4
 5
 6
 7
 8
 9
10
...
auto call = id(internal_light).turn_on();
call.set_rgb(1.0, 1.0, 1.0);

switch (id(menu_state)) {
  case 0: call.set_effect("None"); call.set_brightness(0.0); break;
  ...
  case 4: call.set_effect("Rainbow"); break;
}
call.perform();

Well, if coding it like that, when going from menu position 4 (the Rainbow) to 0 (light off) ESPHome would raise a warning, saying “Can’t set an effect when turning off” (more or less). We’d have to set the effect to “None” in all of the steps, anyway. Might as well do it once and for good.

There’s also an interesting side effect if the menu is implemented like this:

1
2
3
4
5
6
7
switch (id(menu_state)) {
  case 0: call.set_effect("None"); call.set_brightness(0.0); break;
  case 1: call.set_effect("None"); call.set_brightness(0.4); break;
  case 2: call.set_effect("None"); call.set_brightness(0.7); break;
  case 3: call.set_effect("None"); call.set_brightness(1.0); break;
  case 4: call.set_effect("Rainbow"); break;
}

Going from 4 to 0 wouldn’t clear the effect from the light’s state. In case when we’d cycle through the lights from 0 to 4, and back to 0, and scan a card afterwards, the restore_light_state script would restore - and show - the rainbow effect. Even though the lights were off when scanning the card.

Not much of a problem, you’d say? That’s true, but there’s no reason for being sloppy, and leaving the corner cases unhandled.

Finally, ESPHome allows for defining lengths of the clicks, so we can additionally make the lights toggle on/off when the button is pressed for a longer time.

1
2
3
4
    - min_length: 500ms
      max_length: 5000ms
      then:
      - light.toggle: internal_light

  1. Not “usable without the smartphone”. Just “usable”. ↩︎

  2. That’s why the electrical engineers, masters of naming things, call such signals “active low”. ↩︎

RFID Jukebox - This article is part of a series.
Part 3: This Article

Related

RFID Jukebox: The Build
·1533 words·8 mins
Projects Lights Smart Home DIY Music Home Assistant Music Assistant
You can use so many cards with this jukebox! No need for a credit card, though.
RFID Jukebox: The Story
·2111 words·10 mins
Projects Lights Smart Home DIY Music Home Assistant Music Assistant
Is it a lamp? Is it a music player? No, it’s sup… err, something else.
Butterfly (RGB) Effect
·4967 words·24 mins
Projects Lights Smart Home DIY
This butterfly can have many effects but everyone likes just the rainbow.